Other log files are created for specific purposes, for example, to record all the actions associated with parallel workers.These worker log files are written to the non-editioned file system, under EBSapps/log/adop/<adop_session_id>/<phase_timestamp>. For example, /u01/R122_EBS/fs_ne/EBSapps/log/adop. Review these files when the patching session is complete.
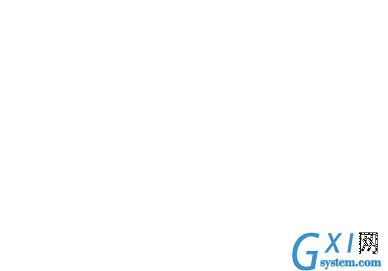
| | The source directory must have all patches to be merged as immediate child directories. The patch directories cannot be in a lower directory. For example, a directory structure for merging four patches would look like this:
Directory Structure for Source and Destination Directories - Merging Four Patches
Naming the Merged Patch
You should indicate the name of the merged patch on the command line, using the -merge_name option to provide a meaningful name. If you do not use this option, the patch will be given the default name of merged.
Merging Zipped Patches
The manifest file is a text file in which you document the location and names of the patch zip files. The contents of a manifest file resemble the following:
/d01/prodappl/patches/p3903945_12_GENERIC.zip
/d01/prodappl/patches/p3892799_12_GENERIC.zip
/d01/prodappl/patches/p3874740_12_LINUX.zip
You can use the -manifest option to create a manifest file. AD Merge Patch references this file, and unzips the patches listed. It copies the unzipped files into the source directory and includes them, along with any other files in the source directory, in the merged patch.
The AD Merge Patch Interface
You run AD Merge Patch and supply the information it needs from the command line. There are no menus or input screens.
Running AD Merge Patch
AD Merge Patch is located in the AD_TOP/bin directory. However, you run it from the parent directory (<top>) of the source directory. The following is a summary of the steps you use to run AD Merge Patch.
Step 1: Set the environment
You must set the environment to indicate the location of the configuration parameters that define your system. This task is common to many AD utilities.
Step 2: Run AD Merge Patch
From the parent directory (<top>), run AD Merge patch using the admrgpch command.
Using AD Merge Patch With adop
You can use AD Merge Patch to merge patches, and then apply them with adop.
In this example, patches 111 and 222 are to be applied after merging. The two patches are staged in <FS_NE>/patch.
$ admrgpch -s <source_directory> -d <destination_directory>
$ pwd
/u01/R122_EBS/fs_ne/EBSapps/patch
$ admrgpch -s /u01/R122_EBS/fs_ne/EBSapps/patch -d /u01/R122_EBS/fs_ne/EBSapps/patch/test
Now patches 111 and 222 have been merged, and the merged patch‘s patchtop is /u01/R122_EBS/fs_ne/EBSapps/patch/test:
$ pwd
/u01/R122_EBS/fs_ne/EBSapps/patch/test
$ ls
fnd  u_merged.drv
You can then apply this patch:
$ adop phase=apply
During the next prepare phase, the synchronization steps expect the individual patches (111, 222) to be present under the merged patch‘s patchtop; in this example, /u01/R122_EBS/fs_ne/EBSapps/patch/test. You therefore need to move 111 and 222 to under /u01/R122_EBS/fs_ne/EBSapps/patch/test before running the next prepare:
$ pwd
$ /u01/R122_EBS/fs_ne/EBSapps/patch
$ mv 111 /u01/R122_EBS/fs_ne/EBSapps/patch/test
$ mv 222 /u01/R122_EBS/fs_ne/EBSapps/patch/test
$ cd /u01/R122_EBS/fs_ne/EBSapps/patch/test
$ ls
111  222  fnd  u_merged.drv