uniapp怎么做首页幻灯片
时间:2022-02-23 17:49
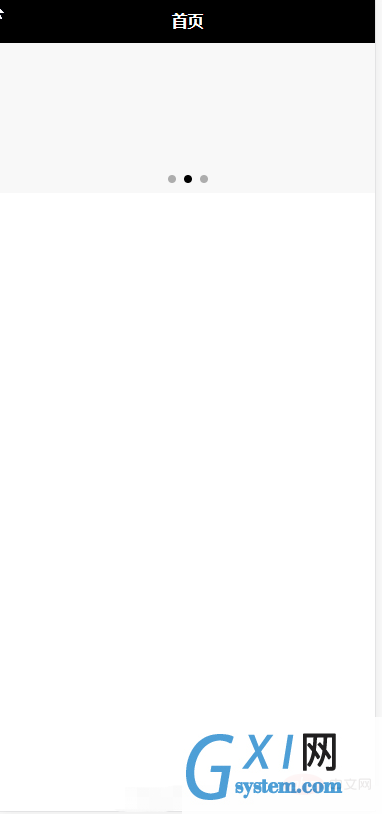
uniapp做首页幻灯片的方法:首先修改配置文件;然后编写首页代码,代码为【<view class="page-section-spacing">】;最后是完成css代码并运行即可。 本教程操作环境:windows7系统、uni-app2.5.1版本,该方法适用于所有品牌电脑。 推荐(免费):uni-app开发教程 uniapp做首页幻灯片的方法: 1、修改配置文件 首先我们需要在前面创建的项目根目录下面的页面配置文件中(pages.json)将导航栏背景设置为黑色,并且将头部字体颜色设置为白色。 配置完成之后代码如下: 2、编写首页代码 需要在首页添加幻灯片,我们这里需要用到uni-app官方的组件,具体使用方法大家可以点击链接查看:swiper随后,依次打开目录pages>index>index.vue,而在index.vue中创建项目的时候已经有一部分代码了,这部分代码对于我们来说没什么用,所以我们先删除这些原有的代码,删除之后如下图: 删除完已有的代码之后,我们开始编写自己想要的代码,这里要在首页添加一个幻灯片功能,所以这里开始编写幻灯片代码。 在uni-app中一个页面是有三部分组成的:模板代码(视图)、js代码(数据、交互)、css代码(视图样式),这里我们先编写模板代码如下: 其次是js代码,因为这里暂时还没有用到数据以及用户交互,所以这里就先不改变js代码,保留如下: 最后是css代码,如下: 3、运行 运行到谷歌浏览器就可以看到如下效果: 最后附上整个页面的代码: 相关免费学习推荐:php编程(视频) 以上就是uniapp怎么做首页幻灯片的详细内容,更多请关注gxlsystem.com其它相关文章!
{
"pages": [ //pages数组中第一项表示应用启动页,
{
"path": "pages/index/index",//首页文件路径
"style": {
"navigationBarTitleText": "首页"//首页头部标题
}
}
],
"globalStyle": {
"navigationBarTextStyle": "white",//导航栏标题颜色(仅支持 black/white)
"navigationBarTitleText": "WPApp",//导航栏默认标题
"navigationBarBackgroundColor": "#000000;",//导航栏背景颜色,此处为黑色
"backgroundColor": "#F8F8F8"//页面背景颜色
}
}
<template>
    <view>
        <view class="uni-padding-wrap">
            <view class="page-section swiper">
                <view class="page-section-spacing">
    <!-- 一组幻灯片代码开始,用到组件swiper -->
<!-- indicator-dots autoplay interval……:组件相关属性,具体可以查看官网说明 -->
                    <swiper class="swiper" indicator-dots="indicatorDots" autoplay="autoplay" interval="interval" duration="duration">
                        <!-- 每组幻灯片中的子项目 1 -->
<swiper-item>
<!-- 此处放内容,可以是图片,也可是图片加文字 -->
                        </swiper-item>
<!-- 每组幻灯片中的子项目 2 -->
                        <swiper-item>
<!-- 此处放内容,可以是图片,也可是图片加文字 -->
                        </swiper-item>
<!-- 每组幻灯片中的子项目 3 -->
                        <swiper-item>
<!-- 此处放内容,可以是图片,也可是图片加文字 -->
                        </swiper-item>
                    </swiper>
                </view>
            </view>
        </view>
    </view>
</template><script>
export default {
data() {
return {
}
},
onLoad() {
},
methods: {
}
}
</script><style>
/* 将这组幻灯片中的子项目改成我们设计图中的灰色 */
swiper-item{
background-color: #f8f8f8;
}
</style>
<template>
<view>
<view class="uni-padding-wrap">
<view class="page-section swiper">
<view class="page-section-spacing">
<!-- 一组幻灯片代码开始,用到组件swiper -->
<!-- indicator-dots autoplay interval……:组件相关属性,具体可以查看官网说明 -->
<swiper class="swiper" indicator-dots="indicatorDots" autoplay="autoplay" interval="interval" duration="duration">
<!-- 每组幻灯片中的子项目 1 -->
<swiper-item>
<!-- 此处放内容,可以是图片,也可是图片加文字 -->
</swiper-item>
<!-- 每组幻灯片中的子项目 2 -->
<swiper-item>
<!-- 此处放内容,可以是图片,也可是图片加文字 -->
</swiper-item>
<!-- 每组幻灯片中的子项目 3 -->
<swiper-item>
<!-- 此处放内容,可以是图片,也可是图片加文字 -->
</swiper-item>
</swiper>
</view>
</view>
</view>
</view>
</template>
<script>
export default {
data() {
return {
}
},
onLoad() {

},
methods: {

}
}
</script>
<style>
/* 将这组幻灯片中的子项目改成我们设计图中的灰色 */
swiper-item{
background-color: #f8f8f8;
}
</style>


