photoshop制作气泡的图文操作
时间:2022-10-26 13:27
有很多朋友对photoshop制作气泡的操作还存在疑惑,所以今天呢,小编就分享了photoshop制作气泡的图文操作方法。
photoshop制作气泡的图文操作
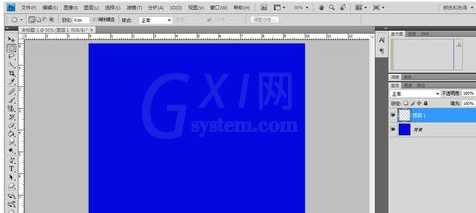
新建画布,填背景色蓝色
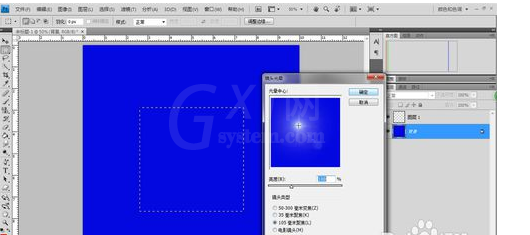
新建正方形选区,然后选择渲染——滤镜,镜头光晕——105毫米聚焦。
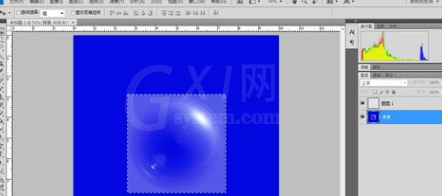
继续对选区做滤镜效果,扭曲——极坐标——极坐标到平面坐标。
Ctrl+T水平翻转选区,旋转后进行下一步滤镜,再做一次极坐标——平面坐标到极坐标。

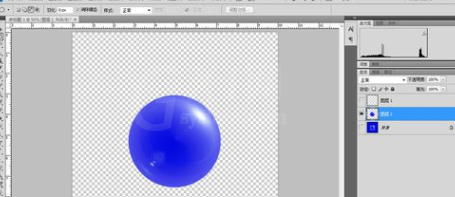
做圆形选区,框住气泡,然后Ctrl+J。气泡出来了。
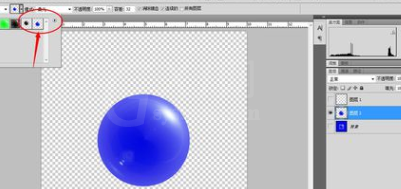
点击编辑,然后 定义到图案。
然后就可以用油漆工具喷了。
快来学习学习photoshop制作气泡的图文操作内容吧,一定会帮到大家的。


热门排行
今日推荐


热门手游
-
商场购物模拟器官方版

版本:v1.0.9
大小:46.11MB
日期:2024-12-16
-
滚动方块大冒险免费版

版本:v1.0.5
大小:26.10MB
日期:2024-12-16
-
恋恋奇缘体验服版

版本:v1.0.0
大小:131.33MB
日期:2024-12-16
-
炉石传说官方正版

版本:v1.0
大小:100.52MB
日期:2024-12-16
-
人群大师免费版

版本:v2.15.0
大小:57.68MB
日期:2024-12-16
-
方鸡跳跑单机版

版本:v1
大小:63.49MB
日期:2024-12-16