Ae制作摄像机效果的图文操作
时间:2022-10-26 13:41
有的用户还不了解Ae制作摄像机效果的操作,下文就分享Ae制作摄像机效果的图文操作教程,希望对你们有所帮助哦。
Ae制作摄像机效果的图文操作
A.制作背景
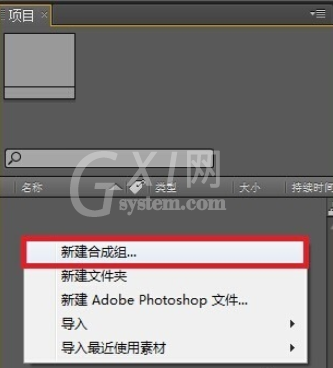
创建新合成。在项目窗口中的空白处单击鼠标右键,然后选择【New Compsition(新建合成)】,如图所示。
在【(合成属性窗口)】中,在【合成组名称】中设置名称为【合成1】,【preset(预置)】为【PAL D1/DV】,【Duration(持续时间)】为 6秒。最后单击【OK(确定)】,如图所示。

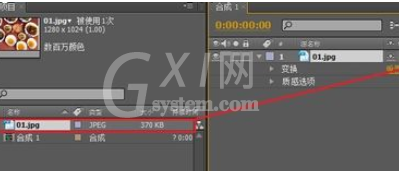
在项目窗口空白处双击,在弹出的窗口中选择所需素材文件,然后单击打开。

将项目窗口中的【01.jpg】图片拖拽到时间线窗口中,并开启后面的三维图层。
B.创建摄像机
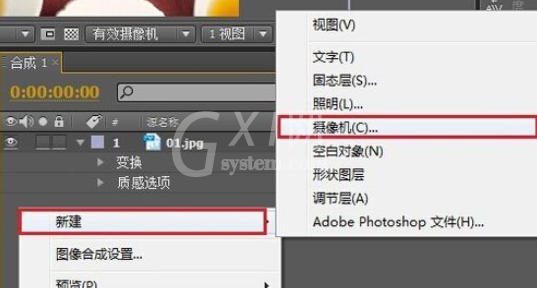
在时间线窗口中右击,在弹出的菜单中选择【新建】/【摄像机】,如图所示。
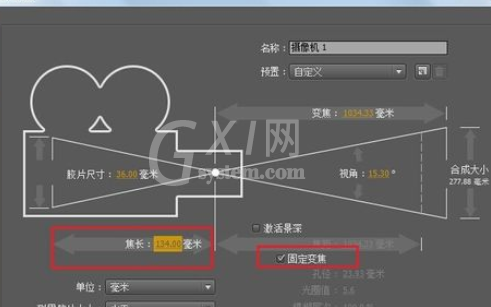
在弹出的窗口中设置【焦距】为134,然后勾选【锁定焦距】,然后单击【确定】。
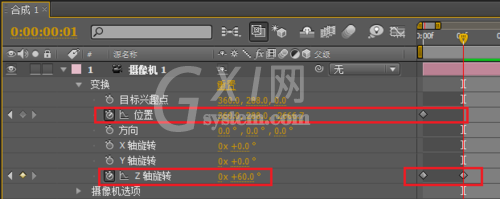
将时间线拖到起始帧的位置,然后单击【位置】和【Z轴旋转】前面的自动关键帧按钮,并设置【位置】为(360,288,-2666.7),【Z轴旋转】为0度。将时间线拖到第1秒的位置,设置【Z轴旋转】为60度。
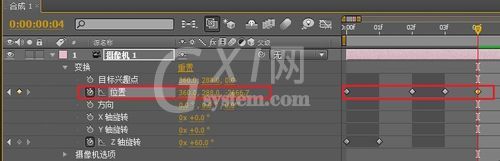
将时间线拖到第2秒的位置,然后设置【位置】为(360,-1000,-3025.7)。接着将时间线拖到第4秒的位置,然后设置【位置】为(360,288,-2666.7)。
此时拖动时间线滑块查看最终效果。
各位小伙伴们,看完上面的精彩内容,都清楚Ae制作摄像机效果的图文操作了吧!


热门排行
今日推荐


热门手游
-
商场购物模拟器官方版

版本:v1.0.9
大小:46.11MB
日期:2024-12-16
-
滚动方块大冒险免费版

版本:v1.0.5
大小:26.10MB
日期:2024-12-16
-
恋恋奇缘体验服版

版本:v1.0.0
大小:131.33MB
日期:2024-12-16
-
炉石传说官方正版

版本:v1.0
大小:100.52MB
日期:2024-12-16
-
人群大师免费版

版本:v2.15.0
大小:57.68MB
日期:2024-12-16
-
方鸡跳跑单机版

版本:v1
大小:63.49MB
日期:2024-12-16