dreamweaver cs6拖动AP元素的操作步骤
时间:2022-10-26 17:00
小伙伴们你们知道在dreamweaver cs6怎样拖动AP元素吗?今天小编很乐意与大家分享在amweaver cs6拖动AP元素的技巧,感兴趣的可以来了解了解哦。
dreamweaver cs6拖动AP元素的操作步骤

我们需要先新建一个HTML空白页
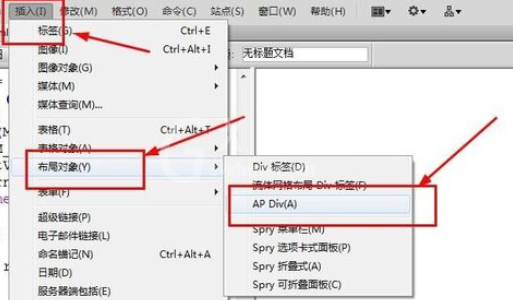
然后我们在菜单栏中选择’插入‘----’布局对象‘-----’AP div命令‘,在页面中插入一个div层
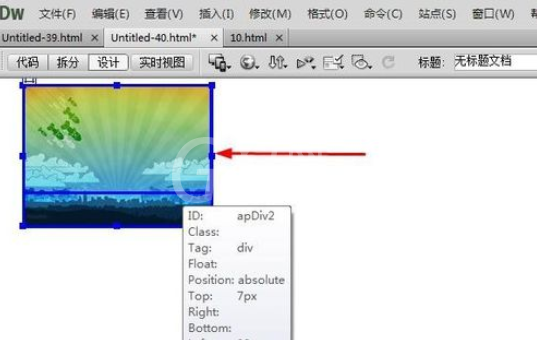
接着我们在层内插入一副图片
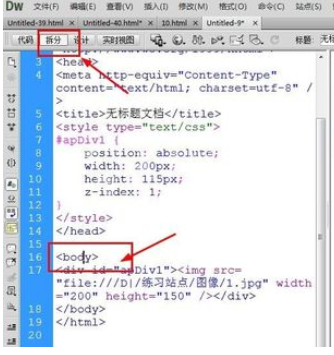
接下来我们打开’拆分‘视图,将光标放在在之间
在行为控制面板中选择添加按钮,在弹出的菜单中选择’拖动AP元素‘
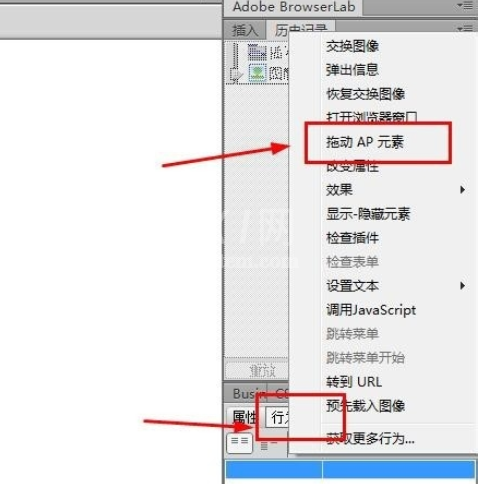
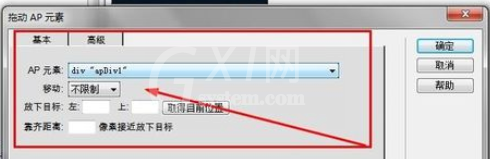
在弹出的’拖动AP元素‘对话框中选择移动’不限制‘
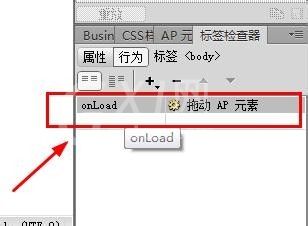
在行为控制面板中选择’onload'
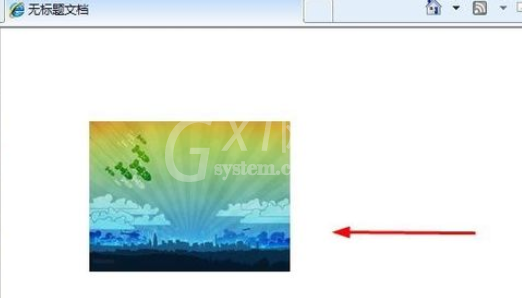
最后我们按F12按钮在IE中预览,在360浏览器中预览没有效果。预览时可以点击左键任意拖动
看完了上文为你们所讲述的dreamweaver cs6拖动AP元素的具体操作步骤,各位同学们应该都学会了吧!


热门排行
今日推荐


热门手游
-
商场购物模拟器官方版

版本:v1.0.9
大小:46.11MB
日期:2024-12-16
-
滚动方块大冒险免费版

版本:v1.0.5
大小:26.10MB
日期:2024-12-16
-
恋恋奇缘体验服版

版本:v1.0.0
大小:131.33MB
日期:2024-12-16
-
炉石传说官方正版

版本:v1.0
大小:100.52MB
日期:2024-12-16
-
人群大师免费版

版本:v2.15.0
大小:57.68MB
日期:2024-12-16
-
方鸡跳跑单机版

版本:v1
大小:63.49MB
日期:2024-12-16