按键精灵中实现找图命令的使用教程
时间:2022-10-26 17:02
最近很多朋友咨询关于按键精灵中实现找图命令的使用教程,今天的这篇教程就来聊一聊这个话题,希望可以帮助到有需要的朋友。
按键精灵中实现找图命令的使用教程

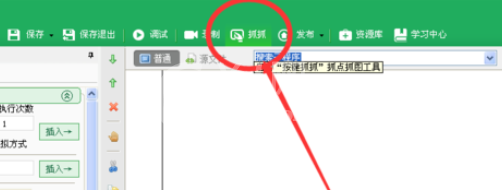
首先我们需要先打开按键精灵软件
新建脚本这些不做赘述,首先我们要用到“抓抓”如图所示,
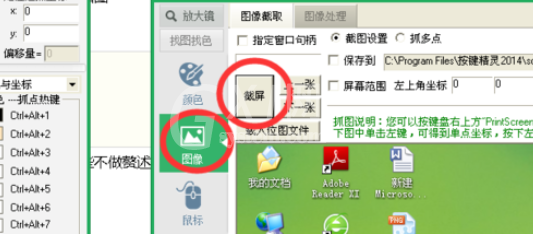
然后我们点击如图所示“图像”,注意把页面切换到您需要截取图片的窗口,然后点击截屏,如图所示
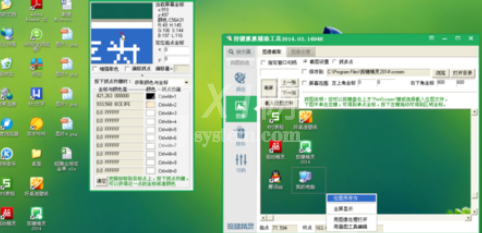
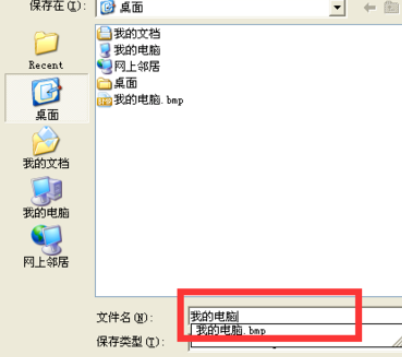
这里以点击桌面《我的电脑为例》,我们先截取电脑桌面整个图片,然后找到《我的电脑》,鼠标左键把《我的电脑》框出来,选择"位图另存为",随便保存在一个容易记的位置,存个名字,操作如图
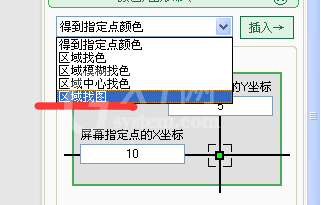
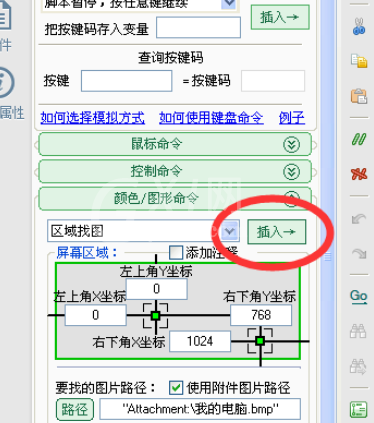
我们再回到主页面,我们选择“颜色/图形命令”,并且在下拉选项中,选择“区域找图”,具体操作如图

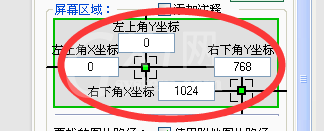
屏幕区域坐标我们要规划好,获取坐标的方式可以从抓抓里获取,然后点击如图所示位置的“路径”,把刚才的截图添加进来,如图

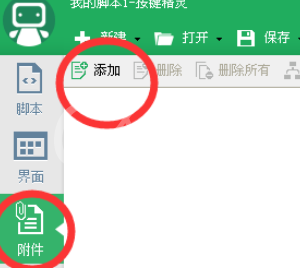
这个时候我们点击“附件”,把抓抓获取的图像信息,添加进来,回到脚本,点击插入,操作如图
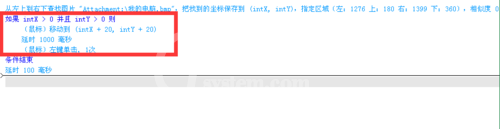
为了避免误差,我们一般会在小区域内做一定范围的偏差,如图X轴Y轴坐标各加20,并且在条件结束前插入鼠标左键单击一次的命令,如图
看完了上文为你们所描述的按键精灵中实现找图命令的操作过程介绍,你们是不是都学会了呀!


热门排行
今日推荐


热门手游
-
商场购物模拟器官方版

版本:v1.0.9
大小:46.11MB
日期:2024-12-16
-
滚动方块大冒险免费版

版本:v1.0.5
大小:26.10MB
日期:2024-12-16
-
恋恋奇缘体验服版

版本:v1.0.0
大小:131.33MB
日期:2024-12-16
-
炉石传说官方正版

版本:v1.0
大小:100.52MB
日期:2024-12-16
-
人群大师免费版

版本:v2.15.0
大小:57.68MB
日期:2024-12-16
-
方鸡跳跑单机版

版本:v1
大小:63.49MB
日期:2024-12-16