CentOS如何配置Nginx反向代理
时间:2023-05-18 00:20
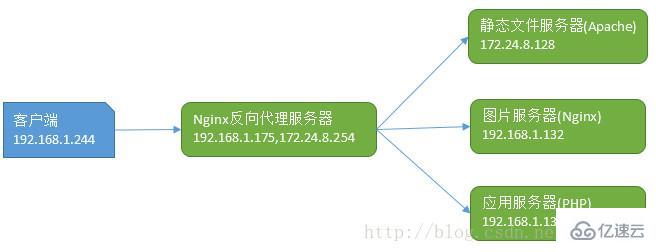
1、反向代理 反向代理是一种代理服务器,通过代表客户端从一个或多个服务器检索资源。将这些资源重新发送给客户端,就好像它们从Web服务器本身返回一样。与正向代理相反,正向代理是与其关联的客户端联系任何服务器的中介,反向代理是任何客户端与其关联的服务器进行联系的中介。 有关正向代理可参考:基于CentOS 7配置Nginx正向代理 2、本演示中的几个服务器 1、后端服务器配置(Apache) 后端Apache服务器主机名及IP 2、前端Nginx反向代理服务器配置 前端Nginx服务器主机名及IP Nginx版本 添加一个新的配置文件用作反向代理 查看Apache服务器日志 3、反向代理服务器及后端服务器日志格式设置 为Nginx服务器添加proxy_set_header指令,修改后如下 后端服务器Apache日志格式设置 后端服务器采用Nginx的配置 前端Nginx配置 验证代理情况,在ip为192.168.1.244测试对images目录下的jpg文件请求 php服务器端配置(ip 192.168.1.132) Nginx代理端配置(ip 192.168.1.175) 测试反向代理至php Nginx upstream指令也可以将请求代理到后端服务器 如下示例,结合upstream指令演示将其代理到tomcat proxy模块的可用配置指令非常多,它们分别用于定义proxy模块工作时的诸多属性,如连接超时时长、代理时使用http协议版本等。下面对常用的指令做一个简单说明。 proxy_read_timeout    在连接断开之前两次从接收upstream server接收读操作的最大间隔时长; 如下面的一个示例:
一、反向代理及演示环境描述

二、常规反向代理配置
# hostname centos7-web.example.com# more /etc/redhat-release CentOS Linux release 7.2.1511 (Core)# ip addr|grep inet|grep global inet 172.24.8.128/24 brd 172.24.8.255 scope global eno16777728# systemctl start httpd.service# echo "This is a httpd test page.">/var/www/html/index.html# curl http://localhost This is a httpd test page.
# hostname centos7-router # more /etc/redhat-release CentOS Linux release 7.2.1511 (Core) # ip addr |grep inet|grep global inet 172.24.8.254/24 brd 172.24.8.255 scope global eno16777728 inet 192.168.1.175/24 brd 192.168.1.255 scope global dynamic eno33554960
# nginx -V nginx version: nginx/1.10.2
# vim /etc/nginx/conf.d/reverse_proxy.conf server { listen 8090; server_name localhost; location / { proxy_pass http://172.24.8.128; ###反向代理核心指令 proxy_buffers 256 4k; proxy_max_temp_file_size 0; proxy_connect_timeout 30; proxy_cache_valid 200 302 10m; proxy_cache_valid 301 1h; proxy_cache_valid any 1m; } }# systemctl reload nginx# ss -nltp|grep nginx|grep 8090LISTEN 0 128 *:8090 *:* users:(("nginx",pid=78023,fd=8),("nginx",pid=78021,fd=8))# curl http://localhost:8090 ##基于本地测试This is a httpd test page.# more /var/log/httpd/access_log ##请求IP地址为172.24.8.254,当从其他机器请求时也是172.24.8.254这个IP172.24.8.254 - - [30/Oct/2017:14:02:38 +0800] "GET / HTTP/1.0" 200 27 "-" "curl/7.29.0"
# grep proxy_set_header -B2 /etc/nginx/conf.d/reverse_proxy.conf location / { proxy_pass http://172.24.8.128; proxy_set_header X-Real-IP $remote_addr; }# systemctl reload nginx.service# vim /etc/http/conf/httpd.conf# LogFormat "%h %l %u %t "%r" %>s %b "%{Referer}i" "%{User-Agent}i"" combined #注释此行,添加下一行 LogFormat "%{X-Real-IP}i %l %u %t "%r" %>s %b "%{Referer}i" "%{User-Agent}i"" combined #关键描述 {X-Real-IP}i# ip addr|grep inet|grep global #从1.132主机访问 inet 192.168.1.244/24 brd 192.168.1.255 scope global eth0# curl http://192.168.1.175:8090 #从1.244主机访问 This is a httpd test page#再次查看apache访问日志,如下,不再是代理服务器IP地址,此时显示为1.244 192.168.1.244 - - [30/Oct/2017:15:49:07 +0800] "GET / HTTP/1.0" 200 27 "-" "curl/7.19.7 (x86_64-redhat-linux-gnu) libcurl/7.19.7 NSS/3.14.0.0 zlib/1.2.3 libidn/1.18 libssh3/1.4.2"三、基于目录匹配反向代理
# more /etc/redhat-release ##os平台及ip地址 CentOS release 6.7 (Final)# ip addr|grep eth0|grep global inet 192.168.1.132/24 brd 192.168.1.255 scope global eth0# nginx -v ##nginx版本 nginx version: nginx/1.10.2# mkdir -pv /usr/share/nginx/html/images ##创建图片目录 mkdir: created directory `/usr/share/nginx/html/images'# cp /usr/share/backgrounds/nature/*.jpg /usr/share/nginx/html/images/. ##复制图片文件# cp /etc/nginx/conf.d/default.conf /etc/nginx/conf.d/default.conf.bk# vim /etc/nginx/conf.d/default.conf ##此处直接修改缺省配置文件 server { listen 80 default_server; listen [::]:80 default_server; server_name _; root /usr/share/nginx/html;# Load configuration files for the default server block. include /etc/nginx/default.d/*.conf; location / { } location /images { alias /usr/share/nginx/html/images; ##此处配置了别名 } error_page 404 /404.html; location = /40x.html { } error_page 500 502 503 504 /50x.html; location = /50x.html { } }# /etc/init.d/nginx reloadReloading nginx: [ OK ]# vim /etc/nginx/conf.d/reverse_proxy.conf server { listen 8090; server_name localhost; location / { proxy_pass http://172.24.8.128; proxy_set_header X-Real-IP $remote_addr; } location /images { ##将images目录下的文件代理至192.168.1.132 proxy_pass http://192.168.1.132; proxy_set_header X-Real-IP $remote_addr; } }# systemctl reload nginx# ip addr|grep inet|grep global inet 192.168.1.244/24 brd 192.168.1.255 scope global eth0# curl -I http://192.168.1.175:8090/images/Garden.jpg HTTP/1.1 200 OK Server: nginx/1.12.2 Date: Tue, 31 Oct 2017 01:48:18 GMT Content-Type: image/jpeg Content-Length: 264831 Connection: keep-alive Last-Modified: Mon, 30 Oct 2017 08:21:28 GMT ETag: "59f6e108-40a7f" Accept-Ranges: bytes
四、基于特定文件类型的反向代理配置
# ss -nltp|grep php LISTEN 0 128 192.168.1.132:9000 *:* users:(("php-fpm",7147,8),("php-fpm",7148,0),("php-fpm",7149,0))# mkdir -pv /data ###存放php代码# echo "/data 192.168.1.0/24(rw)" >/etc/exports# /etc/init.d/rpcbind start# /etc/init.d/nfslock start# /etc/init.d/nfs start # echo "" > /data/index.php# mkdir /data# mount -t nfs 192.168.1.132:/data /data# ls /data index.php# vim /etc/nginx/conf.d/reverse_proxy.conf server { listen 8090; server_name localhost; location / { proxy_pass http://172.24.8.128; proxy_set_header X-Real-IP $remote_addr; } location /images { proxy_pass http://192.168.1.132; proxy_set_header X-Real-IP $remote_addr; } location ~ .php$ { root /data; fastcgi_pass 192.168.1.132:9000; fastcgi_index index.php; fastcgi_param SCRIPT_FILENAME /scripts$fastcgi_script_name; include fastcgi_params; } }# systemctl restart nginx[root@ydq05 ~]# ip addr|grep inet|grep global inet 192.168.1.244/24 brd 192.168.1.255 scope global eth0 [root@ydq05 ~]# curl -I http://192.168.1.175:8090/index.php HTTP/1.1 200 OK Server: nginx/1.12.2 Date: Tue, 31 Oct 2017 03:22:59 GMT Content-Type: text/html; charset=UTF-8 Connection: keep-alive X-Powered-By: PHP/5.6.0
五、基于upstream 配置反向代理至tomcat
# vim /etc/nginx/conf.d/tomcat.confupstream app { server localhost:8080; keepalive 32;}server { listen 80; server_name localhost; location / { proxy_set_header Host $host; proxy_set_header x-for $remote_addr; proxy_set_header x-server $host; proxy_set_header x-agent $http_user_agent; proxy_pass http://app; }}[root@node132 conf.d]# ss -nltp|grep javaLISTEN 0 1 ::ffff:127.0.0.1:8005 :::* users:(("java",39559,45))LISTEN 0 100 :::8009 :::* users:(("java",39559,43))LISTEN 0 100 :::8080 :::* users:(("java",39559,42))tomcat版本[root@node132 conf.d]# /usr/local/tomcat/bin/catalina.sh versionUsing CATALINA_BASE: /usr/local/tomcatUsing CATALINA_HOME: /usr/local/tomcat ....Server version: Apache Tomcat/7.0.69Server built: Apr 11 2016 07:57:09 UTCServer number: 7.0.69.0OS Name: LinuxOS Version: 2.6.32-573.el6.x86_64Architecture: amd64JVM Version: 1.7.0_79-b15JVM Vendor: Oracle Corporation验证结果# curl http://localhost ......六、proxy模块指令描述
proxy_redirect off; proxy_set_header Host $host; proxy_set_header X-Real-IP $remote_addr; proxy_set_header X-Forwarded-For $proxy_add_x_forwarded_for; client_max_body_size 10m; client_body_buffer_size 128k; proxy_connect_timeout 30; proxy_send_timeout 15; proxy_read_timeout 15;
以上就是CentOS如何配置Nginx反向代理的详细内容,更多请关注Gxl网其它相关文章!


